Friday, January 17, 2014

Polishing Shimano 600 Crankarms

Everybody like shiny stuff. Heck we even like shiny dogs. You know those dog food producers that advertisement their dog food gives your dog a shiny coat? So if your dog is shiny, does that mean he's healthy? If my hair was shiny I'd be regarded as dirty and oily. Anyway...
Here is a set of old Shimano 600 crankarms. Shimano changed the name from 600 to Ultegra sometime in the 90's. I've decided to give them a little clean up and polish.

A few scratches and dents, but still functional.

I start with fine emery paper, then progress to 360, 400, 600, 1000, then 1500 grit sandpaper supported by a file or wood block. That helps to keep the flat profiles flat. I wanted to preserve the profiles. If I wanted to I could remove the angular features and make it oval. It's and easy process, you just need patients.

Think of sanding as the process of leaving the finish with the same size scratches. Once all the scratch become the same size, you progress to finer paper. As the scratches get more uniform along the way, the paper starts to get more traction, and the sheen get shinier and shinier.

Sometimes the crankarm ends need a file to remove the scratches.

 Now just small uniform scratches. Now time for sand paper, and blend it in with the rest of the cranks.

Getting shine.

 Now compare. I've got an almost mirror like finish.


after the sanding I followed with some Mother's Mag polish. I had some scratches that would not come out, but it's still 90% better looking than before.

Sunday, January 12, 2014

Seat Tube Angles, Head Tube Angles, and The Down Tube in Between

If your going to go custom, then go custom. My calculations call for a 73.3 degree seat tube angle, so we shall have one.

Bolted down and secure

Now time to mark the tube with the correct butt placement. The down tube will have a thick butt of around 100mm at the head tube, and around 40 at the bottom bracket. I good practice to place the longer thicker end at the head tube, there is more bending force there than the bottom bracket.

I started with the headtube miter first.

The target was 58.8 degrees. I say 5/100ths of a degree off is a good tolerance. when built this should result in a 71.5 degree seat tube angle.

Mitered and cradling the head tube this one is done.

The other end is a little more complicated since you have to miter both the bottom bracket and the seat tube. With hand tools that oval shape is a process file, try, file more, try again, repeat.

 Getting real close here.

Now time to braze and align. 73.3 seat tube angle, 71.5 head tube angle, 550 top tube, and 66mm bottom bracket drop.

Saturday, January 11, 2014

K Lew's All American Single Speed bike begins.


K Lew's All American Single Speed Cyclo-Cross frame build is underway. We are going to build up this bicycle using all Made in the USA parts, or as much as we can do.
We ordered made in the USA True Temper tubing; GasFlux Brass, Silver, and Flux from Henry James. The set is a blend of Platnium OX, and H Verus tubing.

Made in the USA Paragon Machine Works bottom bracket. There you see it sanded, drilled, and cleaned to be joined to the seat tube. It's a standard 1-1/2", 68mm wide, English threaded. You read that right, sometime parts in the industry are spec'd with both English for one dimension and Metric for the other.

This is the HVERST1 tube. It's 1-1/4" in diameter. The tube is thicker at the bottom then the top. The tube is 0.9mm thick at the bottom for 102mm, then tapers for 63mm till it's 0.6mm thick for the rest of the tube (515mm).

So we lay it out on the tube. The tube comes 680mm long, but we are going to need 555mm. The minimum on the thick end should be 25mm, but since it's a single speed it need to be a little stiff than a regular road frame because you tend to ride out of the saddle a lot more since you only have one gear. I'm going to leave 70mm

The end mitered and ready for the bottom bracket.

A quick test. We are almost there. The end has to be cut so it cradles the bottom bracket centered at a 90 degree angle.

In the jig and we are ready to be cleaned and fluxed.

It's a lot easier to put on the water bottle bosses when the tube is full exposed.

Water bottle bosses and reinforcements. We will braze these in later. .

This is the first pass. The fillet is small because I still have to attach the down tube.

Heat tends to distort things, so we have an alignment table to make sure everything remains square. according to my indictors indicate everything is square. Now on to cut the downtube.

Sunday, January 5, 2014

Specialized Pedal Rebuild


Wait...Specialized doesn't make pedals you say. These are a pair of old Specialized pedals from the 80's. I believe they are MKS with a Specialized stamped on the back side, so technically you might be right.
The first thing you want to do is get all the tools you are going to need. A magnetic bowl to put your parts in is real handy, a 6mm allen wrench to hold the axle from the backside, a 12mm wrench to untighten the lock-nut, and a pedal cap wrench.

You can get the job done with channel locks or pliers as last resort, but the pedal cap wrench get the cap off without marring the cap in any way.

Now that the cap has been removed, now you can loosening the lock nut. It might surprise you, but both the right pedal and left pedal are right hand thread for the bearing adjustment. Since the threads that thread into the pedal on the left side are left hand thread and follow the law of precession.

All bearing cone, washer, and locknut are in the bowl for inspection. Looks like we have contaminated bearings. Note: 11 bearing per side.

 The cup, bearings, and cone under the cap side are as good as you would expect.

 The backside not so much

 In a case of rust it good to have some scotch brite, Ultra fine Scotch brite, and  ultra fine steel wool.

After a once over...

 ...upon closer inspection the spindle's bearing surface is pitted. It's never going to be perfect again. You can only do the best with what you have left.

 I started with medium grit emery paper, then fine, 400, 600, grit wet sand paper back by a small file

 Chuck the axle in you drill and polish with some ultra fine scotch brite.

It's far from perfect, but it was a lot better than what you had. Even if you spent the time sanding out all pits, odds are you would deform and enlarge the shape of the bearing surface. Now if you have a lathe or mill, we might have a solution.

Now it's time to work on the cup. Dremel makes a nice small, fine, stainless wire brush that removes a lot of the muck.

 Dremel also has 3 different grits of polishers that come in real handy for things like this.

Like I said, It's not perfect, but it makes the best of what you have. I've heard of people using JB-Weld to fill the pits. suspect it would work great for a while, but over time after the grease gets ground into the JB-Weld I suspect it will dislodge and possible lock up your bearings.

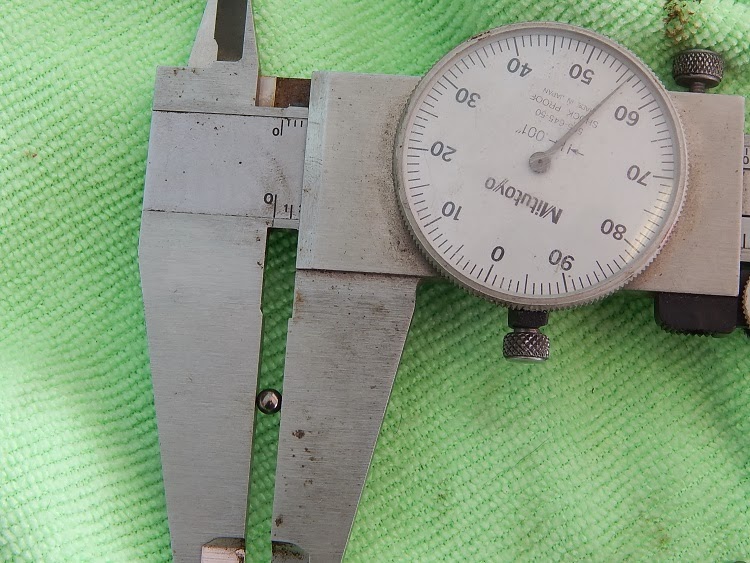
 Toss all the old bearings, even the best ones. Just to double check 0.156" or 5/32"

Now pack with a quality grease like Phil Wood .

Now after it's been reassembled and adjusted I'd put the smoothness factor at a little below a Shimano 105 so to speak. Remarkably there were no tight and loose spots, and the bearing feel is real consistent. I've felt new pedals that didn't run as smooth, so take away from that what you can.
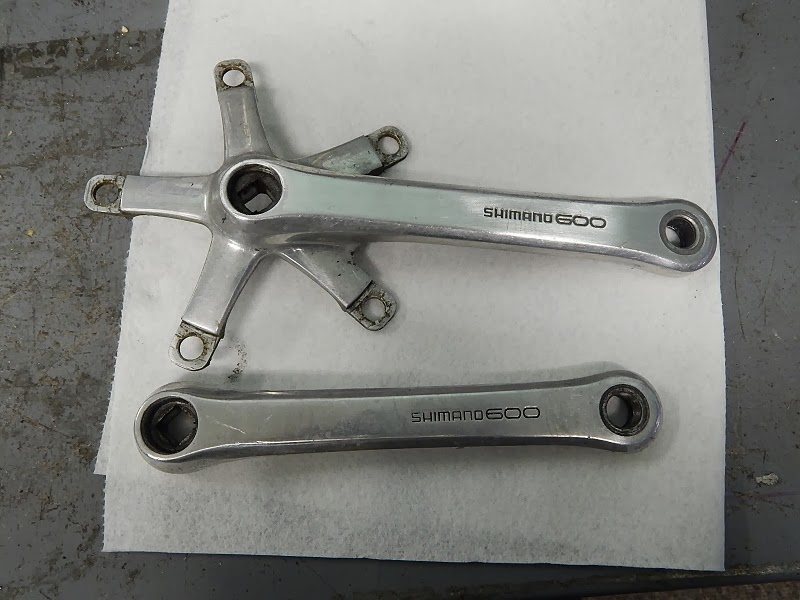