Monday, December 15, 2014

Patching An Inner Tube

You never want to see this. That tire looks a little flat.
I got home from my ride about three hours ago and it was fine then. The evidence points to either two things, A total blow out, or a slow leak.

By putting air in the tube I was able to determine it's a slow leak. I'm also able to find the leak, and most important, its relationship with the tire since I installed the tires with the pressure rating above the valve on the drive side (Right Side).

In other words I can see where the puncture happened in the tire so I can see if any small piece of glass, screw, nail, or whatever is still in the tire. As you can see the cut marks in the tire and tube are a mirror image, and I can see it was a small piece of glass, it even made it through the protection strip. For commuting I highly recommend paying extra for tires with a protection strip. The technology has changed a lot lately, Manufactures can add the strip, while maintaining a lot of the tires compliance so it doesn't ride like a brick.

If I was on the road, I would have replaced the tube. As you are going to see patching a tube on the road involves time and patience. Along with my spare tube bag I carry stick-on/glueless patches in case I have more than one flat, but they are not as reliable as the vulcanizing patches.

Since I'm home, and the hole is small and not where a bunch of seams are, in an open position, I should be able to patch the tube no problem. Why waste a $6 tube when I repair this with a .25 cent patch.

The first thing I need to do is get my patch kit, alcohol pad, baby powder/talc.

Find the hole, then sand a spot bigger than the patch. Sanding the tube gives it texture that allows the patch to adhere better.


Now clean the area with alcohol and let dry.

Now apply the "Vulcanizing fluid". This glue/chemical melts the patch to the rubber tube, but the trick here is to have patience. Apply sparsely and let the fluid dry for about 15 minutes before putting on the patch. This is the reason most attempts fail. I know...how is the patch going to stick, if the glue is dry, but that's just it, it's not glue....it's Vulcanizing fluid (Affirmative Captain).
A trick here I do here is, after I put the glue on, I put air in the tube so I get some bubbles on the hole. The bubbles mark the hole so I can make sure the patch will be centered.

After making sure there is no air in the tube, I apply the patch and press down on it from the center to the sides to make sure the patches surface is 100% adhered.

 Now it's time to weight and wait. I'm going to sandwich it between two 10Lbs. weights. and wait 20 minutes to let the fluid  do it's job on patch and tube. 
Be sure to peel off this top plastic. If the glue did it's job, you shouldn't take the patch off with the plastic. Be easy with this step.

I add baby powder/talc to the inside of my tubes, this allows the tubes to slide inside the tire independent of the tire for when your wheel encounters imperfections in the road. In other words it make it more compliant. I and others have also noticed less pinch flats. Some will tell you that you don't need it, and there is no science behind it, but the reality is you get less flats. 

I also smear some powder on top the new patch to let it slide as it inflates. It also helps it not stick to the tire.
Since I'm not going anywhere soon I will take extra precaution and just inflate the tube to 35psi. This will sandwich the patch between the tube and tire and let it setup in shape. I suspect you could go ahead and inflate it up to 100 psi if you wanted and not have a problem, but everything has it's weak spot. So if there is a bit of patch not setup, do you want 35psi, or 100psi behind it? Since I'm not going to ride for another 10 hours I'm just going to wait till morning. 35 psi is enough to tell in the morning if there is a leak.

One last thing. One thought about the Presta washer/nut. Some people insist you use it. I fall on the side that doesn't.

My thought is since the washer/nut holds the valve in a rigid position, and if you hit a pothole, jump, or bunny hop and deforming your tire, you could tear the valve from the tube if you hit it just right. I've seen a lot of valves pulled from inner tubes, how doesn't this happen? I've never done it in my experience.

Tuesday, November 11, 2014

My Road Bike

I get a lot of questions about my road bike, so here is a little information about it.
Frame Material: True Temper, OX Platinum OS; American Made cycling specific tubing. It's a top of the line, light weight, well tuned tubeset.
 
I also used Henry James, stainless steel dropouts instead of  steel so they will not rust.

FORK: Kestral, Carbon (Aluminum Steerer)
I could have built a steel fork, but I got this fork brand new for $45. It's lighter than steel, and I like the road dampening properties of carbon fiber. It's shape compliments the flow of the rest of the bike, and most important has a 43mm rake. How convenient?

CRANKSET: Shimano, Dura Ace 7800 (53t x 39t, 175mm)

Since I ride/race BMX, CycloCross, Mountain Bikes (MTB) with 175m cranks it only makes sense that my road bike also uses the same to maintain the same pedal circle. I think if I rode just a road bike, I'd use 170mm, but I've been using 175mm for over the last 20 years, I'm well used to them.

BOTTOM BRACKET: Shimano, Dura Ace 9000
The old bottom bracket bearings were worn out, so rather than try to find a 7800, or 6700 bottom bracket I replaced with the new 9000. They fit and now feature  new low drag seals.

PEDALS: Shimano, PD-M979
Yes they are mountain bike pedals (SPD), not a road pedals. like I said I also ride BMX, Cyclocross, and Mountain Bikes that use the MTB format. So why pay $350 for another pair of shoes to break in. (I use Sidi, Dominator cycling shoes, they are leather and once broke in fit like a glove. They are over 10 years old because that's what you get when you buy quality). The PD-M979 are double sided so they are easy to get into, give excellent ground clearance. Some might say that the smaller platform tends to create "Hot Spots" on your feet. I can see how the bigger platform would displace pressure, but isn't it funny how those Randoneer riders who ride 300 mile plus ride tend to ride the SPD format. Before there were XTR pedals on the market, there were the PD-M979 pedals. Light weight, smooth, and reliable, I've had 2 sets for over 15 years and the bearings still feel fine, and the clipless mechanism still works like new.

SHIFTERS/BRAKE LEVERS: Shimano, Dura Ace 7800 STI (10 Speed)
Arguably the best shifters of all time, or at least Shimano's best. The 7800 model was the last generation the derailleur cable was not routed under the     bar tape and was allowed to slide through the housing along a long smooth arc. When the shift cables are routed under the bar tape instead you have 2 tight bends instead of 1 that don't allow the cables to slide as well. To minimize the effects Shimano did come out with most expensive specially coated cables and lined housing that needs regular replacement.

FRONT DERAILLEUR: Shimano, Dura Ace 7800
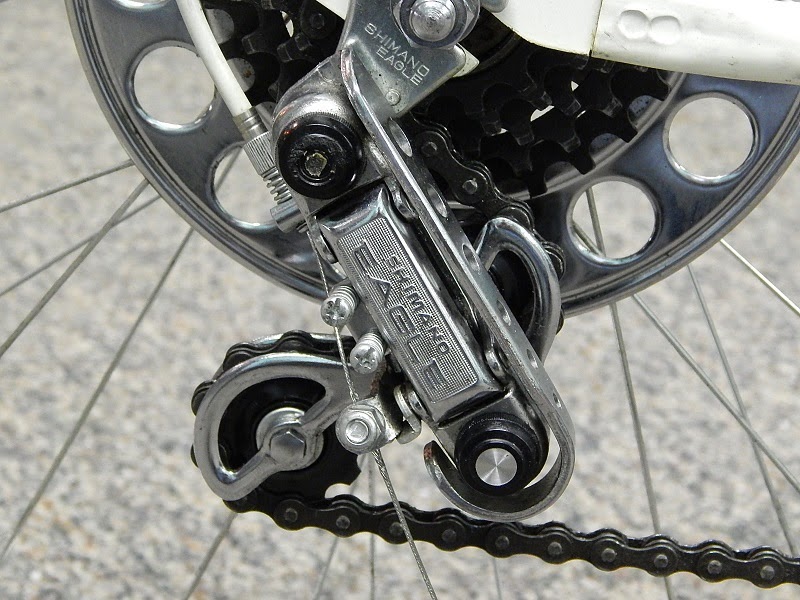
REAR DERAILLEUR: Shimano, Dura Ace 7800


CASSETTE: SRAM, 1070 (12,13,14,15,16,17,19,21,23,25)
To replace a Dura-Ace cassette is expensive. So I consider the Ultegra cassette is just as functional, weights just 50 grams more, and is $100 less. The SRAM is   compatible with the Shimano system and I was interested with the performance. It cost about the same, weights about the same, and performs about the same.

Unlike a lot of people I got a cassette with the 12 as the smallest cog, because do you really need an 11? In the late 80's/90's I used to ride in Cat-2 races with freewheels that had a 13 as the smallest cog, and never thought "Gee I need a 12". If I could I'd swap the 12 for a more functional 18. No doubt I'd use the 18 more than a 12.

CHAIN: KMC, 10speed SL
In my experience KMC makes the best functioning chains right now. Shimano makes a great functioning chain, I mean after all who better than the people that engineered the group (Dura Ace 7800). I just don't like having to replace and break off a pin if I want to take the chain off. (To be honest I really never take   a chain off other than to replace it). SRAM chain use their "Power Link" to make taking the chain off/on easy, but they don't function as well as Shimano, or   KMC...even on their own cassette. I will say the difference is pretty much undistinguishable. I've also found the KMC chains last longer than Shimano, or SRAM. I can't speak for Whipperman but it's on my list of chains to try.
.
BRAKE SET: Shimano, Dura Ace 7800

I can lock up the back wheel with the rear, and I could probably flip myself over the front with the front break if I squeezed tight enough. Light weight and reliable. What more do you need? I use KoolStop Salmon pads for wet. They are softer and wear faster than regular pads, but perform better. The lead edge is arched to remove water before it hits the pad, but it also clears it of dust of better performance. Some might say they are "Graby". I don't find that.

HEADSET: Chris King 1-1/8" NoThreadSet
 Made in the USA and I can't think of a better more reliable headset. I think there are some that are equal, but I found this one first and the price was right.

STEM: Thomson, Elite (120mm x 26.0mm x -10 degree)
Made in the USA and I can't think of a better more reliable Stem a Thomson. I'm a big fan of the no bolt/clamp system for the fork steerer. Enough so I     stuck with the old 26.0mm pardigm for handlebars. I like the looks and no pinch bolts to bang your knees on. There are lighter stem out there, but the stem & handlebars are a bad, if not worst place for failure.

HANDLEBAR: Ritchey, Pro (44mm x 26.0mm)
I used to ride 42cm, but I find I like the increased width at the top better. I could have gotten the lighter WCS model, but I find the Pro's to have less flex, and I said above. The stem & handlebars are a bad, if not worst place for failure. Lighter, more expensive does not always mean better.

Bar End Caps: Velox
Every now and then you bang you knee on the end of your handlebars. These are made of rubber, and the screw mechanism prevents them from falling out. The best caps ever made.

TAPE/GRIP: Zipp, Cyclocross Tape
More padded than regular tape, and has a nice rubbery grip. I'll never go back to Cork Tape again...if I don't have to.

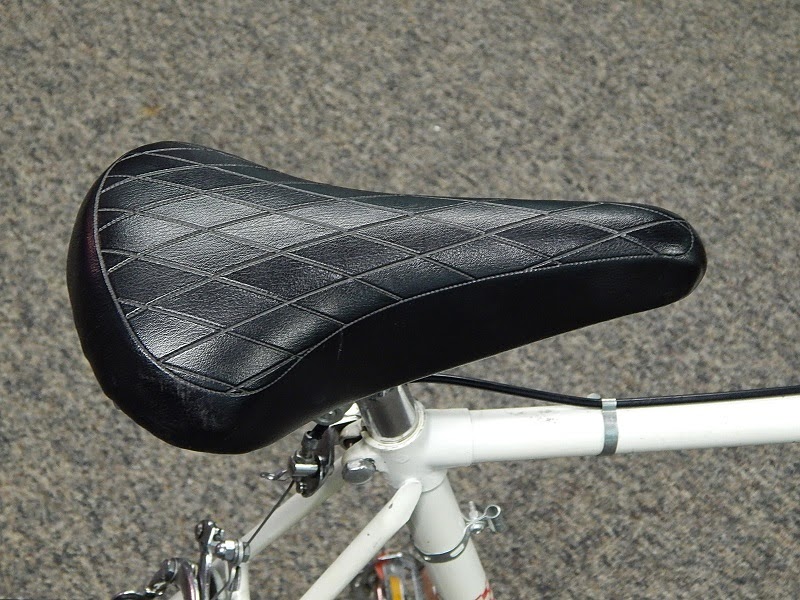
SADDLE: Fizik, Arione (Carbon Rails)
After many years, and many saddles I like this saddle's shape the most. It's flat on top, where a lot of saddles are rounded, or one of those with the cutout. Saddles are a personal preference, and comfort should dictate which saddle you use and not weight.

SEAT POST: Thomson, Elite (27.2mm x 250mm, Straight)
Made in the USA and I can't think of a better more reliable seat post than a Thomson. It's a straight post because the frame is designed with a slack seat tube angle, so the straight post will provide enough setback.

WHEELSET: Shimano, Ultegra WH-6700
Since $2000-$3000 for a nice wheelset has not been in the budget for a while. I went with the Ultegra WH-6700. At the time they were there and the price was right. They are also tubeless compatible with interests me, but I have yet to mess with that. So far these wheels have served me well. They went out of true once   last year, but have remained straight since, and I haven't broken a spoke, and are stiff and solid. They also have a wider rim to give the tire greater air   volume for a smoother ride and less chance for pinch-flats. I was skepical at first, so much after buying them I put them in my closest for over a year without   using them. I have to say I've been impressed with the performance.

TIRES: Vittoria, Open Corsa CX (700c x 23mm)
I was using 25mm Continental, Gatorskins to compliment the wider rims. The Gatorskins are a thicker training tire of sorts, but none-the-less I got a hole torn in one of them and had to switch tires. I had some Vittoria, 23mm Open Corsa CX tires laying around, so I put them on. What can you say about the Vittoria, Open Corsa CX? It's one of the best performing tires ever made. It's supple ride with low rolling resistance. I would like to get a set in 25mm. The only tire closer would be the Continental 4000s.

WEIGHT: It weighs what it weighs
I'm not sure about performance gains from lighter parts are all they are cracked up to be. I suspect I could make the bicycle 1Lbs. or 2 Lbs. lighter, but at what cost, and for what? You can talk about performance gains going from a 20Lbs bike to a 18Lbs bike (10%), but in the equation they always leave out the most important component the rider. What does the rider weight? the rider doesn't just propel the bicycle weight alone. A 180lbs. rider plus a 20Lbs. bike is 200Lbs now the 20bs weight saving that was 10% now becomes 1%.

Monday, April 21, 2014

What is the Value of a Bicycle?

What happened to Value? Value is defined as something to be important or beneficial. Value used to be our primary concern, now it seems it's taken a secondary seat to cost, if it's even being regarded at all. Instead of purchasing an item because it satisfies most, if not all of our needs, now we just purchase the cheapest items we can without regard to how many corners were cut to rely on already over burdened infrastructures. I'm not sure when it all transitioned or how it happened. It seems to have been a slight of hand trick where they decreased an items value, without having to reduce it's price.

Some might be confused about what quality is, so let's define quality: A distinctive attribute or characteristic possessed by someone or something. So quality is not dictated by good or bad; but as much as in right or wrong. For example lets say a designer chooses between expensive titanium bolts, who's quality is hard and brittle; or cheaper grade 5 steel bolts, who's quality is soft and flexible compared to titanium. He chooses the more expensive titanium bolts because he is under the assumption expensive is better, but they break because titanium is very hard and brittle. If he has chose the cheaper grade 5 steel bolts that are softer and flex instead of breaking, then his design would not have failed. We can say his design failed because he picked bolts with poor quality for the job. That was an example of when the lower priced item has more value than the higher priced item.


Every once in a while something comes by that most people over look because at first glance it appears to have no value, mostly because it's "old". Upon closer inspection you will see this bicycle is really well thought out.
I've never heard of the Jason brand of bicycle before. I can't find anything about them. As we see in the picture they are made in Japan. Japan is probably not the place you think of when you think quality bicycles; we think of more romantic places such as Italy, France, and England to name a few.
Japan has a rich cycling background. To get themselves out of dept. after World War II, The Japanese raised money from people gambling on bicycles races called "Keirin". These races are held on short tracks called velodromes. Japan currently has over 40 velodromes which is more than any other country in the world. (Italy has about 30, France 13, and England 19 ).  So even though Japan isn't the first place we think of when we think bicycles. They certainly have an awesome pedigree.
This model of Jason bicycle is called "Interceptor". I love the checkerboard stylings.

Cherry brand brakes. While I don't know anything about these heavy steel Cherry brand brakes. I do like the attention they gave by putting there name on the pivot bolts. Plus the chrome is holding up well for being over 40 years old.

Would a set of lighter aluminum Dia-Compe center pulls like you would expect to see on a 70's bicycle been better ? Certainly lighter, but what about function? A brake gets it's braking power from the leverage that is generated at the pivots. The closer the brake shoes are to the pivots, the more power you get; the longer the straddle wire is from the pivot, the more power you get. The brake shoes are a lot closer to the pivots than the Dia-compe brakes I've seen. So even though they are heavier, they have a higher mechanical advantage? Less cost/More function.

The first thing that caught my eye when I first saw this bike was the cantilever mounts. At first I thought they might be for some proprietary racks or something.

but as you can see there is a hole for a return spring in the post mounts. I know the standard for cantilever post spacing is 80mm, but these measure 65mm. A little research revealed 65mm was one of the standards for cantilever spacing during this bike production was 65mm.

In case you are wondering, yes they are the same on the back. So this manufacture gives you the ability of using either caliper (thinner tire road), or cantilever (fatter tire, off road) style brakes. This bike is what I call a "Do-All-Too-All".

As for shifters, what else would you expect? Shimano with rubber lever covers.

Also paired with the Shimano, Eagle rear derailleur.

With of course the rear derailleur guard incase you have an accident, or if you are a commuter rear derailleurs seemed to get tweaked sometimes at the community bike rack. A derailleur guard discourages that so to speak.

You have to love the matching read on the chain guard, or just the styling of the chain guard in general. Like the brakes the cranks are made from heavier steel instead of lighter aluminum. I suspect the Interceptor model was on the bottom half of the price list, but the 40 year old straight chainrings suggest they were a great value.

Standard issue 70's road saddle. If you ride a lot, this is one item people tend to personalize. While a lot of people keep the original saddle, a lot of people also change the saddle to one that suits their needs. Not bad though for 40 years old.

Here is knowledge that is lost perhaps. I suspect most of todays young bicycle mechanics, who grew up in the world of clipless pedals, was asked to replace these toe clip straps, they would run them back through without twisting them. The twist prevents the strap from being pulled out when the strap is tighten.

Standard issue steel bars and stem. heavy but very functional.

So how does this 40 year old, entry level, bicycle compare to contemporary bicycles. I suspect this bicycle cost $100-$130 brand new in the 70's. The price of gas was 0.40/gal, milk was $1.20/gal, and a stamp was 0.10 cents. What are they today? Gas $3.30, Milk $3.40, and the stamp is 0.49 cents. So we can say commodities have tripled...quadrupled at best. That fact coordinates with my observation that bicycle manufactures seem to start cutting corners at anything below $350-$400. It's the line that bicycles stop being dependable transportation, and become more toy like, almost ornamental.

One big thing that has changed in the last 40 years on bicycles is the innovations in shifting. They have moved away from "Friction Shifting" to "Index shifting" as it's known. Now you can just move the shift lever and click the bicycle changes gear. Not only that, but the faces of the gears have been engineered so you can shift under load. Its a lot cleaner and crisper when it's adjusted right. Personally my commuter bicycle has friction shifting (Suntour, Power Ratchets). The shifters never have to be synchronized, and the mechanisms last a real long time.  For a commuter bicycle I don't see the need for the added expense. If I was racing there is an advantage to the quick and positive, index shifting, but if I'm not racing, then it's something I can do without. While I feel it's fair to say my race bike, cyclo-cross bike, and Mountain bike all have index shifting. I'm just saying once you get used to friction shifting, Index shifting is something you might not value as much.

Entry level bicycles are lighter and shift better than the ones made 40 years ago that's for sure, however I can't say they will last as long. I doubt we see the same proportion of 2014 bicycles in 2054 as we see 1974 bicycles in 2014. The bicycles made today are designed to make a profit, and not outperform the competition for the most part. Then you figure you can probably find a solid bicycle close to the one above for $80- $100....and if you don't like it, you can sell it for probably what you bought it for.

Value is where we find it I guess. I'm just saying don't cast off old things as not having value just because they are old. With the right kind of eyes you can see things that were made with a sense of pride. It's obvious the person who designed the Interceptor had a compass pointing toward performance rather than profit...and that has value.

Saturday, April 5, 2014

At the bike shop we fix all kinds of things.

Sometimes things break that are not bike related. If it involves something made from metal, and you need it fixed, bring it in and let me look at it.
For example this car seat adjustment lever that broke off. In less time than it would take to find a new one, I can have this fixed.

Get both pieces of the plate steel together.

A little cleaning and examination of the break. I should be able to fill the crank, then add some plate on the top and bottom to reinforce it.

 I gave the broken parts, and reinforcement strips a good sanding and cleaning to remove any contaminates

Now a fluxing and careful clamping. The trick will be to not braze the clamps to the work piece. But if arrange and position the clamps right this won't be a problem.

Out of the fire, and it looks like I got everything right. Now just a matter of filing down those reinforcement strips to the width of the plate.

All filed and sanded. Looks like the crack is filled, and the strips well attached. Now it's ready to paint.

Now that the paint has dried, its fully functional and looks brand new.

Reinstalled and better than ever.

Wednesday, March 19, 2014

Chain Check'n Time

When I first got into road cycling back in the 80's, the most amount of cogs you could find on a freewheel was 6. Now with todays technology and precision the amount of cogs on a freewheel has increased to 10, 11, and a company called Tiso has developed a 12 speed, so in fact they have doubled. Not only have they doubled, but fit into about the same size space. They do this by making the cogs, spacing, and chain thinner.
 
So in order for to keep your bicycle shifting with precision, it's essential that your chain's wear is within tolerance. The picture above shows a chain checker. It measures the distance between the chains rollers. Your chain should fall between .25 and .50, then anything over .75 needs to be replaced. The chain above measures almost 1.00 so we are going to replace this chain.

So what does the number of .75 mean anyway? As an experiment I made the new chain with the same amount of links as the old chain and lined then up next to each other.

When a chain wears it will become longer. Some people will say their chain has stretched. Your chain does not actually stretch. The chain gets longer because of the cumulative wear between the pins and rollers. A chain might over 200 rollers and pins. So the cumulation of wear of this 104 link chain turns out to be about 10mm. That's just 4/100ths of a mm per pin and roller. Not much, but added together creates eroded performance.

As you can see the old chain is dirty and grimy. Dirt and grim can cause your chain to wear. So keeping your chain clean and oiled is the best way to increase your chain's life.


Tuesday, February 25, 2014

A look Back At The Maillard Helicomatic Hub


Looking back at the Maillard, Helico Matic hub it was/is a design that has it all...well as far as engineering goes. Let's just say the engineer was far ahead of the quality.
 
I first came across the Maillard, Helico Matic in the mid 80's when the store I worked at sold Trek bicycles spec'd with these hubs. Most people at that time used thread-on freewheels. Another option was the cassette, but these were the days of 6 speed clusters and Campagnolo, Super Records hubs ruled the road way. The Shimano cassette mechanism was a minority, but would soon grow in popularity as more and more cogs were added to the clusters over time.
 
The problem with the thread on freewheel was once the freewheels started going to 7 and beyond this lead to bent axles because of the demand put on them from having to become longer and longer. As you can see below the axle has to extend past the freewheel threads by a little over 30mm.
Below is a Helicomatic hub, and as you can see only has 8mm of axle extending out, making this axle a lot harder to bend. The cassette design would also have the same amount exposed.
One great thing about the design is the ease of removal. All you need is that thin spline wrench that can fit in your wallet, (pictured on the right). The freewheel requires a special tool,( in the case for a Regina America spline tool (They were made by Phil Wood)), and a wrench or vice to turn it. The cassette design uses the same tools as the freewheel only you need an additional chain whip (Not Pictured).


As you can see it's a 6 speed, and a rock solid design. To bad not rock solid parts.
To remove the freewheel as you need is a thin little spline wrench.
Once you get the ring off, just pull...


....VoilĂ !  Its off!


And one thing you still can't do today. Remove a freewheel without removing the quick release.


It's even called a "Helico Matic".